Tutorial: Building With Jenkins Inside an Ephemeral Docker Container
This is the in-depth tutorial for the discussion started here about creating a build farm using Jenkins with Docker containers as the build slaves. When we’re done, you should have a fully functional Jenkins environment that provisions build slaves dynamically running on your local environment and ready for you to productionize.
PRE-REQUIREMENTS
This tutorial assumes you’re starting where we left off with the last blog. This means you have:
-
A functional Jenkins environment, and familiarity with running it
-
A functional Docker for Mac or Docker for Windows installation
-
A basic understanding of Docker and how to build images and Dockerfiles
-
Previous tutorial projects set up locally
Quick Setup
I’ve written this tutorial assuming you’re starting where I left off. If you want to get a local workspace set up fast, just clone my public Github repo (https://github.com/maxfields2000/dockerjenkins_tutorial); you’ll be starting in the Tutorial_06 folder.
-
git clone https://github.com/maxfields2000/dockerjenkins_tutorial.git
-
cd dockerjenkins_tutorial/tutorial_06
I’ve switched to using CentOS 7 base images so you’ll also want to play switcheroo with the Dockerfiles there.
-
mv jenkins-master/Dockerfile jenkins-master/Dockerfile-debian
-
mv jenkins-master/Dockerfile-Centos7 jenkins-master/Dockerfile

CREATING THE BUILDSLAVE DOCKER IMAGE
For this tutorial, our slaves will be pretty simple. I’m going to go with a basic Centos 7 environment with Java 1.8, suitable for running a Jenkins Slave agent. Connections to the slave will be managed by the Docker Plugin which uses a combination of docker create/run and exec commands to start a reverse JNLP connection back to the Jenkins master server. This means you don’t need anything fancy, like SSH, set up in the slave for it to operate as a build environment. We’ll also want this slave running as a non-root user for security purposes.
Let’s get our Dockerfile created:
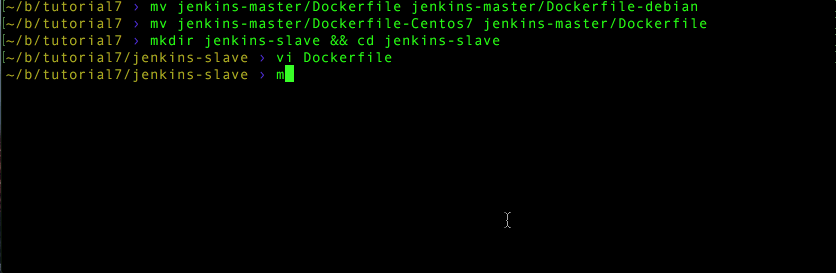
-
Go to your project root directory
-
mkdir jenkins-slave && cd jenkins-slave
-
Use your preferred editor to make a new Dockerfile
-
Add the following text and save:
FROM centos:centos7
LABEL maintainer="[email protected]"

# Install Essentials
RUN yum update -y && \
    yum clean all

# Install Packages
RUN yum install -y git && \
    yum install -y wget && \
	yum install -y java-1.8.0-openjdk && \
	yum install -y sudo && \
	yum clean all

ARG user=jenkins
ARG group=jenkins
ARG uid=1000
ARG gid=1000

ENV JENKINS_HOME /home/${user}

# Jenkins is run with user `jenkins`, uid = 1000
RUN groupadd -g ${gid} ${group} \
    && useradd -d "$JENKINS_HOME" -u ${uid} -g ${gid} -m -s /bin/bash ${user}

RUN chown -R ${user}:${user} /home/${user}

# Add the jenkins user to sudoers
RUN echo "${user}    ALL=(ALL)    ALL" >> etc/sudoers

# Set Name Servers
COPY /files/resolv.conf /etc/resolv.conf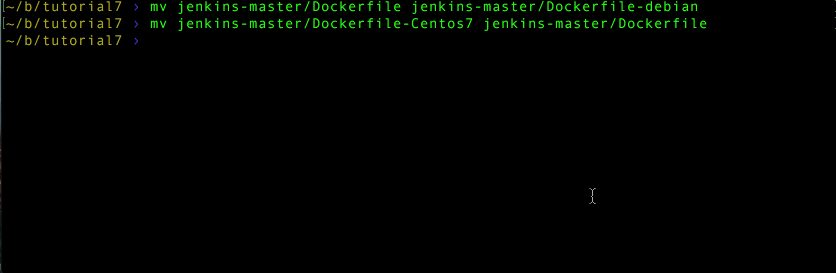
You should be familiar with Dockerfiles by now but I’m going to walk through specific parts of this file and explain why they are here.
PACKAGES WE INSTALL
# Install Packages
RUN yum install -y git && \
         yum install -y wget && \

         yum install -y java-1.8.0-openjdk && \
         yum install -y sudo && \
         yum clean all
Fairly straightforward choices:
-
Java 1.8 - openjdk preferred for Jenkins slaves
-
Git - my preferred source control client
-
Wget - I use this a lot in build scripts and Dockerfile construction
-
sudo - we may need to elevate privileges for certain build job functions, so this is good to have
CONFIGURE THE LOCAL JENKINS USER
ARG user=jenkins
ARG group=jenkins
ARG uid=1000
ARG gid=1000

ENV JENKINS_HOME /home/${user}

# Jenkins is run with user `jenkins`, uid = 1000
RUN groupadd -g ${gid} ${group} \
    && useradd -d "$JENKINS_HOME" -u ${uid} -g ${gid} -m -s /bin/bash ${user}
RUN chown -R ${user}:${user} /home/${user}

# Add the jenkins user to sudoers
RUN echo "${user}    ALL=(ALL)    ALL" >> etc/sudoers
Most of this is standard user setup. Note we re-use the build argument setup we had in the jenkins-master image to define the Jenkins user (this gives you the option to change it easily).
Because build jobs will be running as the jenkins user, we give it sudo privileges so those jobs can elevate their permissions. You may not need this depending on the nature of the work your build jobs do.
SET UP NAME SERVERS
# Set Name Servers
COPY /files/resolv.conf /etc/resolv.conf
I’ve run into some interesting situations where Docker containers struggled to route or resolve DNS names correctly, so I’ve taken to making sure the proper DNS servers are added to my build slaves. In my environments at Riot I use internal name servers, but for this demo we’ll use Google’s public ones. We’ll create the source file for this in a bit.
CREATING THE RESOLV.CONF FILE
Here’s a resolv.conf file to use for demonstration purposes, it just maps to Google DNS servers:
nameserver 8.8.8.8
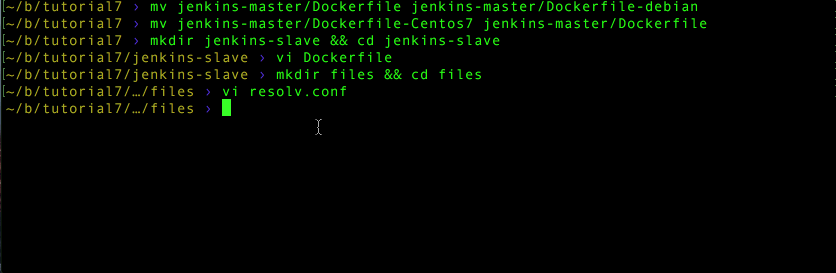
nameserver 8.8.4.4Create a new directory for this file:
-
mkdir files && cd files
-
Using your favorite editor, place the above text in resolv.conf and save
Add and remove entries as appropriate for your local network. For example, we use internal Riot DNS servers in most cases so we can route to our artifact storage, image repositories, and other essentials.
TEST YOUR SLAVE BUILD
Head back to your project root directory and build the slave.
-
cd ../..
-
docker build -t testslave jenkins-slave
Assuming everything ran without error, you’re now ready to add the slave to the Docker Compose project.
MAKE A DOCKER-PROXY CONTAINER AND UPDATE DOCKER-COMPOSE
We’ll need to add one more container to your Jenkins ecosystem. The problem we need to solve is that Jenkins, once configured, will want to talk to a Docker Host to provision slaves on as part of it’s configuration for the Docker Plugin. The only Docker Host we have is your development environment running Docker for Mac or Docker for Windows.
By default Docker for Mac and Docker for Windows don’t expose the common public port 2375 for Docker. While Docker for Windows let’s you enable this as a feature, Docker for Mac does not for security reasons (see here). In the absence of a solution that works the same way on both platforms, the simplest solution for Docker for Windows is to enable exposing the port, which I’ll walk through at the end of this section). If you’re using Docker for Mac you’ll need to do a bit more work. The good news is you’ll have this solved in no time with your newfound docker-compose and Dockerfile powers.
Creating Your Proxy Image
First we need to set up a Docker-Proxy image. The goal here is to take your docker.sock file and expose it on port 2375 securely and only to Jenkins. We need to do this because the Jenkins Docker plugin expects to talk over TCP/IP or HTTP to a port. In a production environment this would be some kind of Docker Swarm end point, but here on our local setup it’s just your desktop. Keep in mind that we don’t want to expose that port on your desktop to your network. So once we have an image, we’re going to have it join our docker-network for Jenkins where it can keep that port private.
You know the drill for building your image. We’re going to make a Dockerfile in a directory and add that image to the docker-compose.yml file so compose can build and run it for us and manage its network settings.
To start, make sure you’re in your project root directory:
-
mkdir docker-proxy
-
vi docker-proxy/Dockerfile
-
Add the following Dockerfile:
FROM centos:centos7
LABEL maintainer="[email protected]"RUN yum -y install socat && \
yum clean allVOLUME /var/run/docker.sock
# docker tcp port
EXPOSE 2375ENTRYPOINT ["socat", "TCP-LISTEN:2375,reuseaddr,fork","UNIX-CLIENT:/var/run/docker.sock"]
-
Save your Dockerfile and exit your editor
You’ll see this is pretty simple. Socat is a simple linux utility for transporting data between two byte streams. You can read more about it at this great linux.com article. We’re making a simple docker image to put our docker.sock from our desktop on one end and TCP port 2375 on the other. This is why the docker images is mounting a volume that contains the socket file, bridging desktop with docker network..
Adding the Proxy to Docker-Compose
To add this proxy to our setup we’re going to play a few nifty Docker networking tricks with our docker-compose file. Go ahead and open your docker-compose.yml file and do the following:
-
Add the following to create an entry for your new slave at the end of the service section of your compose file:
-
slave:
build: ./jenkins-slave
-
-
Add the following service after the “slave:” service setup
-
proxy:
-
Build: ./docker-proxy
volumes:
- /var/run/docker.sock:/var/run/docker.sock
networks:
jenkins-net:
aliases:
- proxy1
Here’s what you just added in detail:
-
Add a new service we’re going to call proxy.
-
Instead of a “build” reference it uses an image, which in this case comes from dockerhub. The means docker-compose will auto-pull this image down if it’s not deployed (remember all my warnings however about using things you didn’t build).
-
It provides a “docker run” command of “-i” (We can see this by reading the source for the docker-proxy).
-
It mounts /var/run/docker.sock into the container (this is your local docker socket). That’s because the proxy works by exposing this via HTTP (on port 2375 by default).
-
We have it join the jenkins-net network so any container on that network can see it.
-
We give it a DNS alias of proxy1. This is because containers will use their Docker-compose names, underscores and all, by default . That causes some problems for the Docker Plugin which needs a solid tcp:// name to connect to, so we just choose a simpler new name.
With that in place, your compose file will now create a proxy service that listens on port 2375 but is only exposed to containers on your jenkins-net network. This keeps your local environment secure while still allowing apps like Jenkins to talk to your Docker Host!
The final Docker Compose file should look like:
version: '3'
services:
  master:
    build: ./jenkins-master
    ports:
      - "50000:50000"
    volumes:
      - jenkins-log:/var/log/jenkins
      - jenkins-data:/var/jenkins_home
    networks:
      - jenkins-net
  nginx:
    build: ./jenkins-nginx
    ports:
      - "80:80"
    networks:
      - jenkins-net
  slave:
    build: ./jenkins-slave
 proxy:
    image: ehazlett/docker-proxy:latest
    command: -i
    volumes:
      - /var/run/docker.sock:/var/run/docker.sock
    networks:
      jenkins-net:
        aliases:
          - proxy1
volumes:
  jenkins-data:
  jenkins-log:
networks:
  Jenkins-net:
The last thing we want to do is update the makefile to ensure that it doesn’t bring up a jenkins slave when we run up for docker-compose. Open up the makefile for edit and make sure it looks like this:
build:
	@docker-compose -p jenkins build
run:
	@docker-compose -p jenkins up -d nginx master proxy
stop:
	@docker-compose -p jenkins down
clean-data:
	@docker-compose -p jenkins down -v
clean-images:
	@docker rmi `docker images -q -f "dangling=true"`
jenkins-log:
	@docker-compose -p jenkins exec master tail -f /var/log/jenkins/jenkins.log
WINDOWS USERS
If you use Docker for Mac, skip this section. If you're a Docker for Windows user, hopefully you came here and didn’t make the Docker proxy. Windows doesn’t have a docker.sock file, or any socket file compatible for sharing with a Linux container, so the proxy solution won’t work for you. Unfortunately you’ll have to just have your Docker for Windows host listening on port 2375. Word of caution here, if you want to use Windows docker hosts in a production environment, don’t have them listen on a public port like this. It’s useful for a tutorial/local development but you’ll need to do more to secure your Dockerhosts in production. Thankfully Docker for Windows makes this very easy to set up.
Open your Docker for Windows taskbar manager and navigate to settings. On the main general settings page, enable the Expose daemon setting:
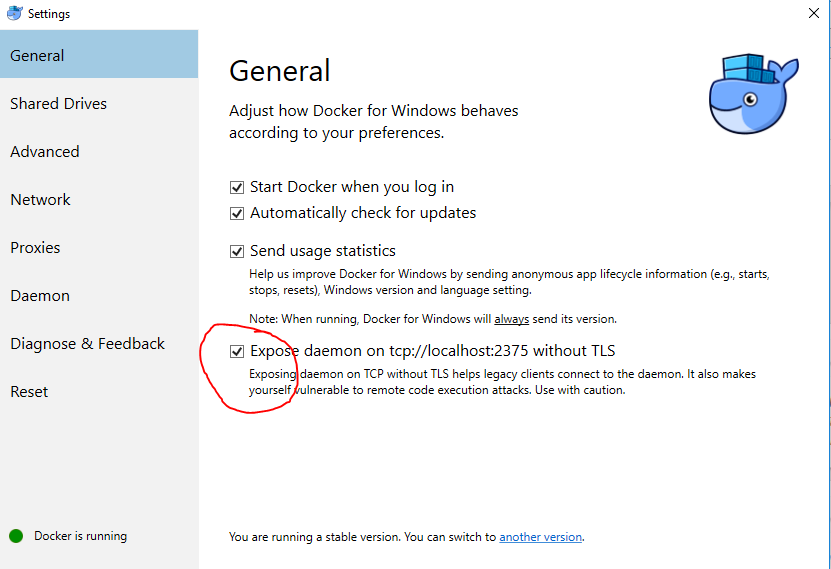
Let Docker for Windows restart and you’re good to go. In the tutorial github repo I have altered the makefile with a run-win directive which just doesn’t start the proxy container. For this tutorial just remember you don’t need to add the docker-proxy to your docker-compose file. You also don’t need to reference the docker-proxy in your makefiles, though you can. Just use the run-win option in your makefile if you do.
UPDATE THE JENKINS MASTER DOCKERFILE
With the slave properly built, tested, and added to the docker-compose file we need to make a few adjustments to the Jenkins Master dockerfile. In particular, we have two things we need to add:
-
Pre-install the Docker Plugin and dependencies
-
Toggle off the Jenkins startup wizard
INSTALL THE DEFAULT PLUGINS
In the last tutorial, I mentioned the nifty shell script utility that Cloudbees provides in their default Jenkins image to help preload plugins when building a new image, and we’ll take advantage of that here.
We want to install the Docker Plugin, which requires the following plugins:
-
jdk-tool
-
jclouds-jenkins
-
Durable-task
-
ssh-slaves
-
token-macro
The ssh-slaves plugin is part of a default Jenkins install these days, but we need to install the other four. This is easy to accomplish:
-
Create a jenkins-master/plugins.txt file in your favorite editor
-
Add the following four lines to it and save:
jdk-tool
jclouds-jenkins
token-macro
durable-task
docker-plugin
All that is required now is to place that file in the Jenkins image and run the install-plugins.sh script created in the last tutorial. To achieve this, let’s edit the jenkins-master Dockerfile and add a two new lines.
-
Edit jenkins-master/Dockerfile in your favorite editor
-
Add the following lines right after the “# Copy in local config files” section:
# Install default plugins
COPY plugins.txt /tmp/plugins.txt
RUN /usr/local/bin/install-plugins.sh < /tmp/plugins.txt
TOGGLE OFF THE STARTUP WIZARD
During most of the tutorials I left the Jenkins startup wizard on. In this final tutorial, we’re turning our Jenkins-in-a-box into a real test setup and we don’t want to go through the startup wizard every time we create or initialize our Jenkins server. Thankfully cloudbees offers a toggle to disable the wizard in the JAVA_OPTS environment variable. Just remember, this leaves your Jenkins server in an unprotected state. You should add an admin account or other form of authentication if you intend to use this setup in production.
Disable the startup wizard by editing your jenkins-master Dockerfile:
-
Find the line for ENV JAVA_OPTS=
-
Add the following text after the memory setting: -Djenkins.install.runSetupWizard=false
-
Save your Dockerfile!
At this point your Jenkins-Master Dockerfile should look like this:
FROM centos:centos7
LABEL maintainer="[email protected]"

RUN yum makecache \
    && yum update -y \
    && yum install -y \
    wget \
    zip \
    openssh-client \
    unzip \
    java-1.8.0-openjdk \
    && yum clean all

ARG user=jenkins
ARG group=jenkins
ARG uid=1000
ARG gid=1000
ARG http_port=8080
ARG agent_port=50000
ARG JENKINS_VERSION=2.112
ARG TINI_VERSION=v0.17.0

# jenkins.war checksum, download will be validated using it
ARG JENKINS_SHA=085f597edeb0d49d54d7653f3742ba31ed72b8a1a2b053d2eb23fd806c6a5393

# Can be used to customize where jenkins.war get downloaded from
ARG JENKINS_URL=https://repo.jenkins-ci.org/public/org/jenkins-ci/main/jenkins-war/${JENKINS_VERSION}/jenkins-war-${JENKINS_VERSION}.war

ENV JENKINS_VERSION ${JENKINS_VERSION}
ENV JENKINS_HOME /var/jenkins_home
ENV JENKINS_SLAVE_AGENT_PORT ${agent_port}
ENV JENKINS_UC https://updates.jenkins.io
ENV JENKINS_UC_EXPERIMENTAL=https://updates.jenkins.io/experimental
ENV JAVA_OPTS="-Xmx8192m -Djenkins.install.runSetupWizard=false"
ENV JENKINS_OPTS="--handlerCountMax=300 --logfile=/var/log/jenkins/jenkins.log  --webroot=/var/cache/jenkins/war"
ENV COPY_REFERENCE_FILE_LOG $JENKINS_HOME/copy_reference_file.log

# Use tini as subreaper in Docker container to adopt zombie processes
ADD https://github.com/krallin/tini/releases/download/${TINI_VERSION}/tini /bin/tini
RUN chmod +x /bin/tini

# Jenkins is run with user `jenkins`, uid = 1000
# If you bind mount a volume from the host or a data container,
# ensure you use the same uid
RUN groupadd -g ${gid} ${group} \
    && useradd -d "$JENKINS_HOME" -u ${uid} -g ${gid} -m -s /bin/bash ${user}

# Jenkins home directory is a volume, so configuration and build history
# can be persisted and survive image upgrades
VOLUME /var/jenkins_home

# `/usr/share/jenkins/ref/` contains all reference configuration we want
# to set on a fresh new installation. Use it to bundle additional plugins
# or config file with your custom jenkins Docker image.
RUN mkdir -p /usr/share/jenkins/ref/init.groovy.d

# Install Jenkins
# could use ADD but this one does not check Last-Modified header neither does it allow to control checksum
# see https://github.com/docker/docker/issues/8331
RUN curl -fsSL ${JENKINS_URL} -o /usr/share/jenkins/jenkins.war \
  && echo "${JENKINS_SHA}  /usr/share/jenkins/jenkins.war" | sha256sum -c -

# Prep Jenkins Directories
RUN chown -R ${user} "$JENKINS_HOME" /usr/share/jenkins/ref
RUN mkdir /var/log/jenkins
RUN mkdir /var/cache/jenkins
RUN chown -R ${user}:${user} /var/log/jenkins
RUN chown -R ${user}:${user} /var/cache/jenkins

# Expose Ports for web and slave agents
EXPOSE ${http_port}
EXPOSE ${agent_port}

# Copy in local config files
COPY init.groovy /usr/share/jenkins/ref/init.groovy.d/tcp-slave-agent-port.groovy
COPY jenkins-support /usr/local/bin/jenkins-support
COPY plugins.sh /usr/local/bin/plugins.sh
COPY jenkins.sh /usr/local/bin/jenkins.sh
COPY install-plugins.sh /usr/local/bin/install-plugins.sh
RUN chmod +x /usr/share/jenkins/ref/init.groovy.d/tcp-slave-agent-port.groovy \
    && chmod +x /usr/local/bin/jenkins-support \
    && chmod +x /usr/local/bin/plugins.sh \
    && chmod +x /usr/local/bin/jenkins.sh \
    && chmod +x /usr/local/bin/install-plugins.sh

# Install default plugins
COPY plugins.txt /tmp/plugins.txt
RUN /usr/local/bin/install-plugins.sh < /tmp/plugins.txt

# Switch to the jenkins user
USER ${user}

# Tini as the entry point to manage zombie processes
ENTRYPOINT ["/bin/tini", "--", "/usr/local/bin/jenkins.sh"]
As always, I’m using CentOS as my preferred core image. See my previous blog posts on changing this to something you’re comfortable with like Ubuntu or Debian as you see fit.
BUILD EVERYTHING
All the base files are updated so we’re now ready to build the new project. Let’s go ahead and do that to make sure we have a fresh set of images.
-
make build (or: docker-compose -p jenkins build)
-
make clean-images (or: docker rmi `docker images -q -f "dangling=true"`)
You’ll note that during the jenkins-master build we have a bit of a delay when it installs the default jenkins plugins. This is because we’re actively downloading the plugin files during the image build process.
CONFIGURING JENKINS
We’re in the final stretch. With our new images built we just need to configure the Docker Plugin in Jenkins to know where our Docker for Mac/Win based Dockerhost is and map our build slave image to a Jenkins label. To do that, we actually need Jenkins up and running, so let’s take care of that.
-
If your previous instance is still running run the command: make clean-data to clear up old volumes and running instances
-
make run (or: docker-compose -p jenkins up -d nginx data master)
-
Point your browser to: http://localhost
-
Jenkins may take a few moments to load
Before we continue, I want to cover some quick Jenkins basics. Jenkins has a concept of a “build node” and a “job.” Build nodes have N number of executors. When Jenkins wants to run a job, it tries to find a spare executor (on a build node) to run that job. A default Jenkins installation will try to find any spare executor to run on. While simple, most Jenkins installs modify this because they want certain jobs to run on certain kinds of build nodes (imagine wanting a Windows operating system versus a Linux operating system). To do that, “labels” are applied to build nodes, and jobs are then restricted to only run on build nodes with matching labels.
For our ephemeral Docker slaves, we’re going to leverage this label capability to tie Docker images and jobs to those labels. Thanks to the excellent design of the JClouds plugin and Docker Plugin, Jenkins will check the label of a job when it enters the queue. The plugin will ascertain that there are no available executors for the job, and therefore attempt to create a build node with an appropriate Docker image. The new node will be given the correct label, and the queued build job will run.
It is, in effect, almost like magic! This behavior is the key to how ephemeral nodes work.
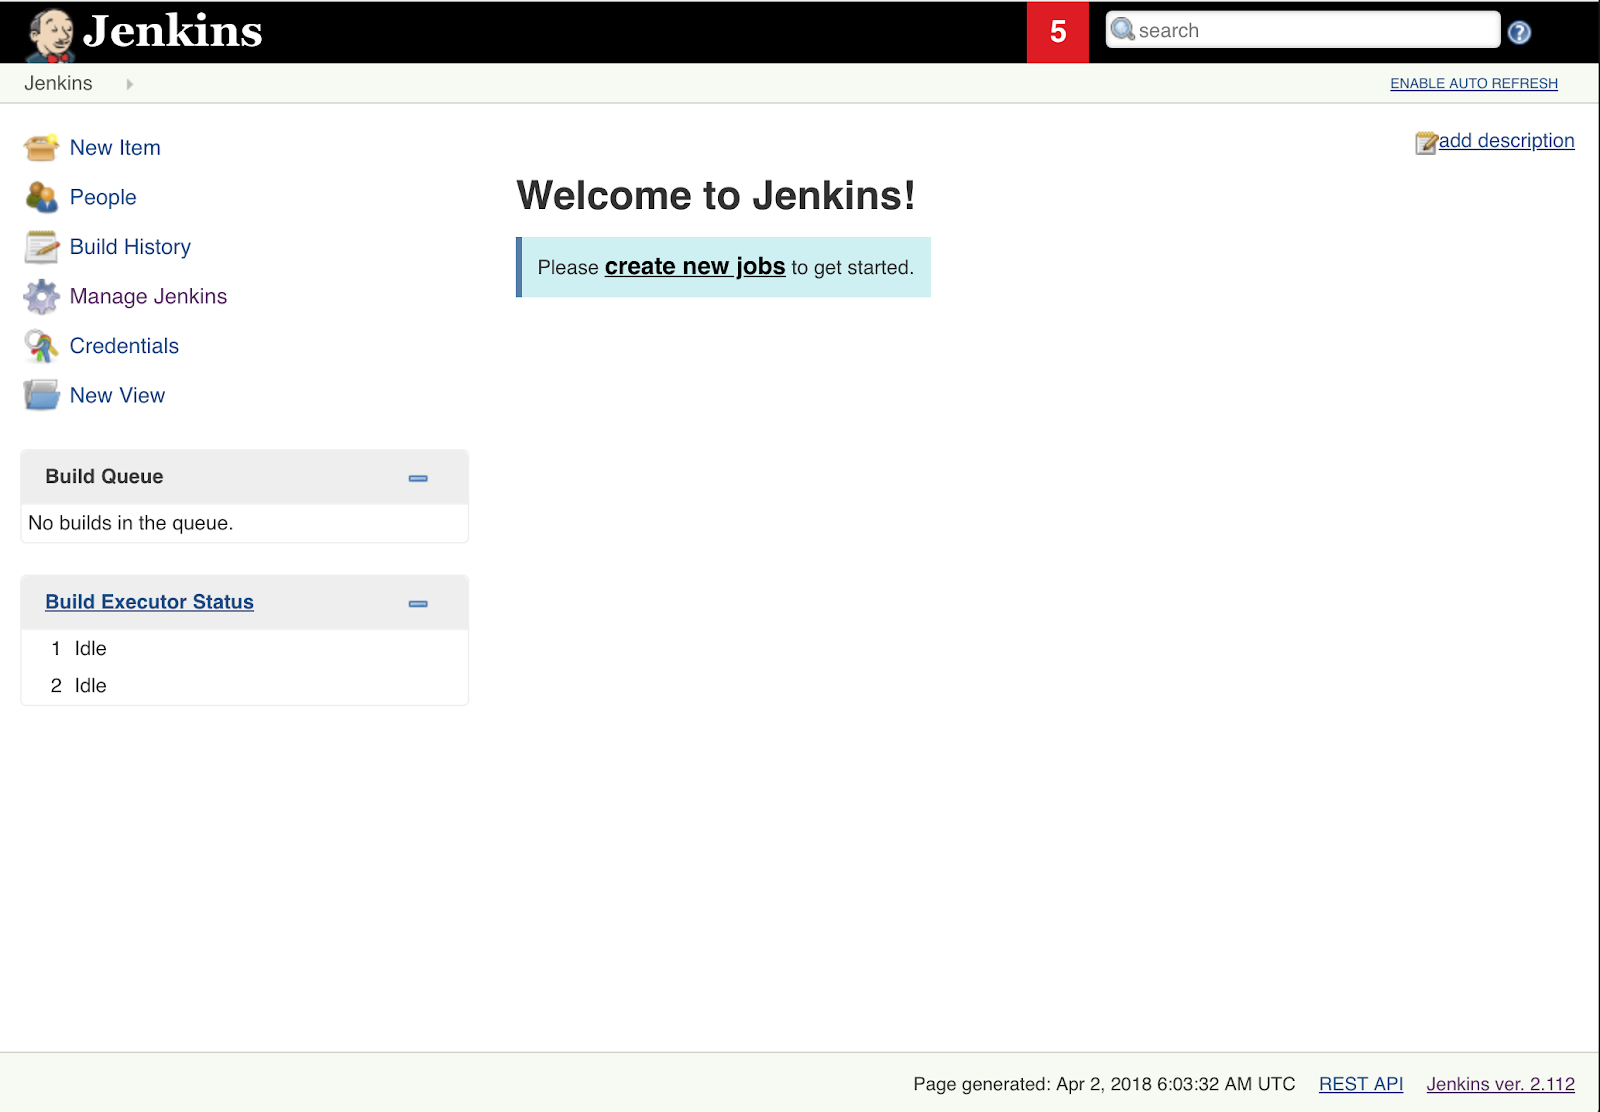
We’re now ready to configure our Dockerhost and first ephemeral slave on Jenkins. On the Jenkins landing page do the following:
-
Click on Manage Jenkins
-
Click on Configure System
-
Scroll down until you find Add new cloud as a drop down (this comes from the Jclouds plugin)
-
Select Docker from the drop down
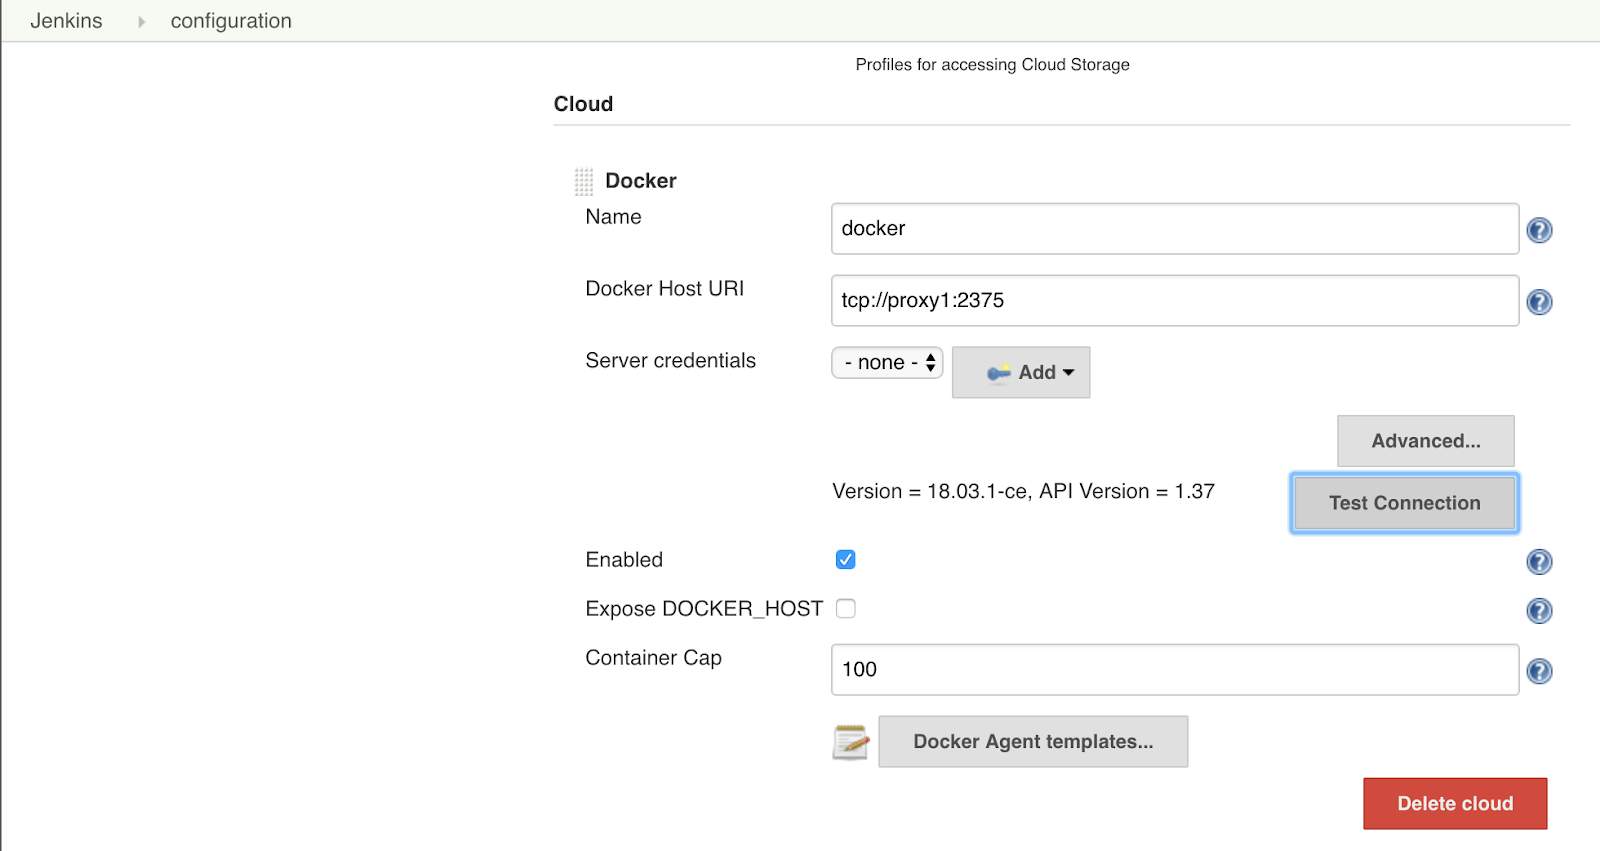
A new form pops. This form is the high level information you need to enter about your Dockerhost. Please note, you can create many Dockerhosts if you want. This is one way you can manage which build images run on which machines. For this tutorial, we’ll stick with one.
-
In the Name field enter “LocalDockerHost”
-
In the Docker Host URI field enter: “tcp://proxy1:2375”
-
Note WINDOWS USERS ONLY: You aren’t using a proxy container, so just set this to: tcp://docker.for.win.localhost:2375 which happens to be a prenamed DNS entry for your convenience.
-
Click on Test Connection and you should get a response that shows Version and API version of your docker host.
If no response comes back or you get error text, something has gone wrong and Jenkins cannot talk to your Dockerhost. I’ve done my best to make sure this walkthrough “just works” but here’s a quick list of things that could be broken and affect this:
-
Your docker-compose file has a typo in it. Verify that there is an Alias for the proxy container set to “proxy1.”
-
Your docker proxy didn’t start for some reason. Check docker ps and verify you have a proxy container running.
-
For some reason your docker.sock file is not at /var/run/docker.sock. This tutorial assumes a default installation of Docker for Mac/Win. If you’ve reconfigured it then this won’t work.
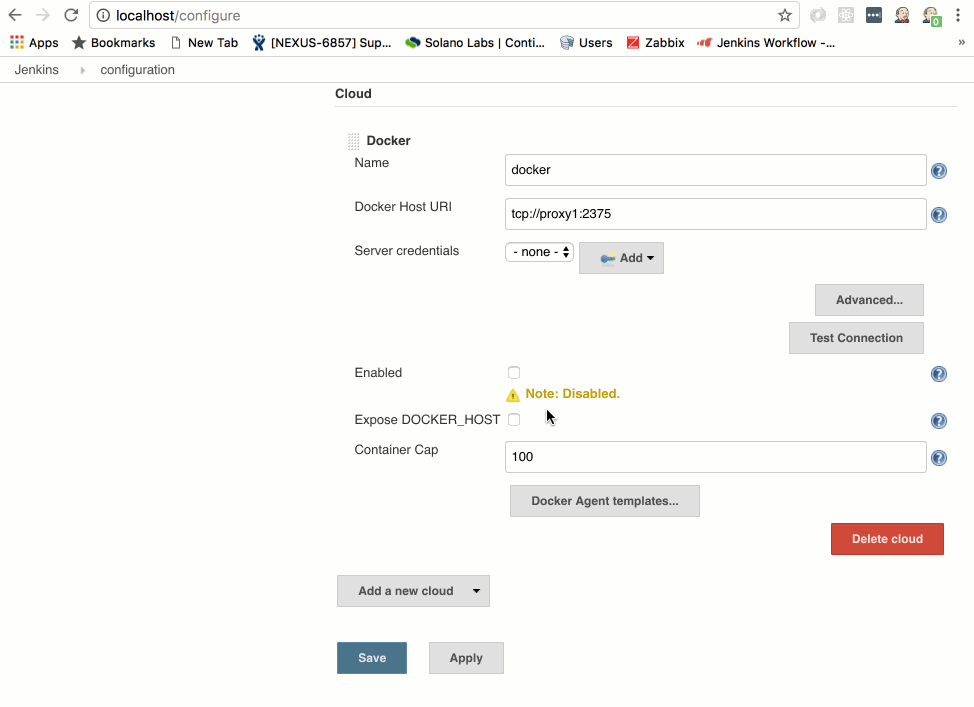
Assuming you got a successful version response when testing the connection, we can proceed. We want to add our freshly minted build slave image as a potential build node candidate.
-
Click the Enabled checkbox (by default this is off, this is a convenient way to disable a cloud provider for maintenance/etc in jenkins)
-
Click on the Docker Agent templates... button
-
Click on Add Docker Template button
-
In the Labels field enter testslave
-
Make sure the Enabled checkbox is selected (you can use this to disable specific images if they are causing problems)
-
For the Docker Image field enter: jenkins_slave
-
For Remote Filing System Root enter /home/jenkins (this will be where the jenkins workspace goes in the container)
-
For Usage select only build jobs with the label expressions matching this node
-
Make sure the Connect Method is set to Attach Docker Container (this is the default and allows jenkins to attach/exec into the container, start the jenkins slave agent and point it back to your Jenkins server)
-
For User enter jenkins
-
-
Change pull strategy to Never pull (we make this image by building it, not pulling it from a repo)
Click Save at the bottom of the configuration page
We have one last thing to do now, and that’s make a build job to test this setup and confirm everything works.
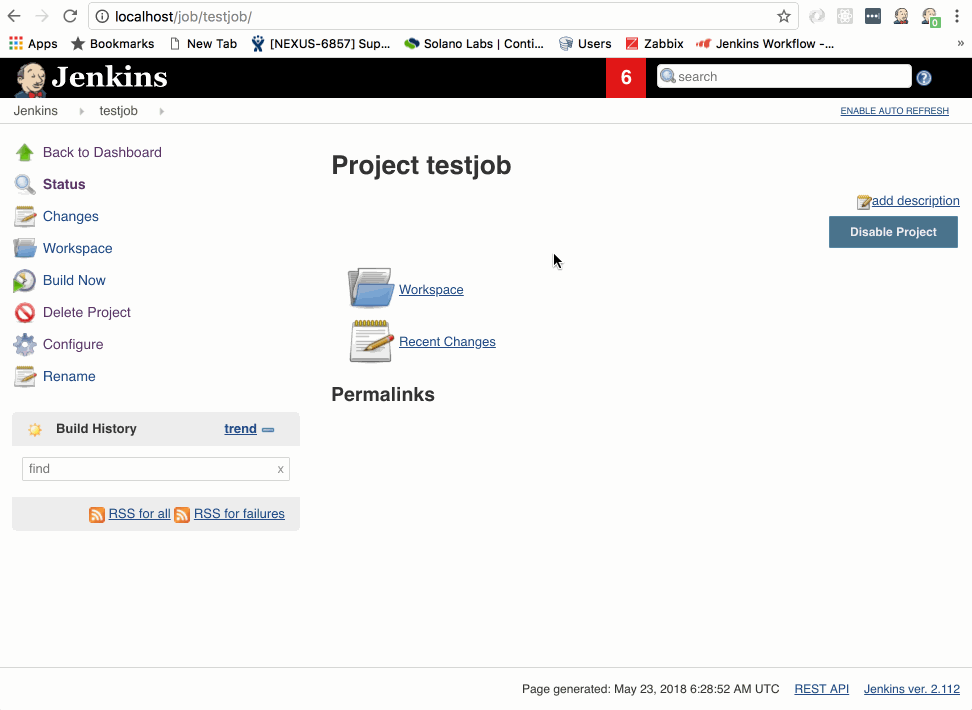
CREATE THE TEST JOB
From a Jenkins perspective, nothing changes about making jobs. We want to make sure that the job we create is restricted to the label we set on the Docker image node we configured: testslave.
-
On the Jenkins landing page and click New Item
-
For Item name enter “testjob”
-
Select Freestyle project
-
Click OK
-
Make sure Restrict where this project can be run is checked
-
Enter “testslave” in the Label Expression
-
Scroll down and select Execute shell from the Add build step drop down
-
In the Execute Shell command box, enter: ‘ echo "Hello World! This is baby’s first ephemeral build node!" && Sleep 1’
-
Click Save
You’ll now be on your new jobs landing page. Why do I have you add Sleep 1? Fun fact: the Docker Attach provisioner is so fast that if your build job takes under a second to run I’ve found that it has trouble cleaning up the the build slave, so making it take just a little bit of time is useful to making sure you don’t have slaves that don’t clean up.
You’re now ready for the moment of truth.
- Click on Build Now
The testjob will enter the build queue and you might see “waiting on available executors” while Jenkins goes about provisioning a new build slave. Depending on your system, this can happen very fast - so fast, in fact, that it might provision, run your simple echo command, and exit before you’ve had time watch it. Or it may take 20-30 seconds. I can tell you from personal experience, this is a bit like watching a kettle of water boil.
If something has gone wrong, the job will hang in the build queue, waiting on a node to provision. Debugging this and other pro-tips could really be another entire blog post, but here are a few pointers:
-
Make sure there are no typos in the label chosen, either in the Jenkins master configuration or on the job configuration itself. Jenkins should confirm that it found testslave in one Cloud provisioner.
-
Double, triple, quadruple check that when configuring the Docker host a positive response comes back from Test Connection.
-
Make sure the image name entered in the jenkins configuration matches the name of the image you see when you run Docker images in your command line for your build slave (it should be jenkins_slave).
-
Make sure you set the network mode in the Create Container Settings section. It should be jenkins_jenkins-net.
-
Make sure you chose Different Jenkins URL under Launch Mode and that it is set to: http://jenkins_master_1:8080/ (the forward slashes do matter!).
For deeper analysis you can always go to the jenkins logs and see what the plugin is complaining about. Jenkins Landing Page -> Manage Jenkins -> System Log -> All Jenkins Logs. A lot can be derived from the errors it generates. You can also check logs on the system at the command line as well, I left a handy make jenkins-log shortcut to tail the jenkins logs. Or look for the jenkins_slave containers being spun up in docker ps and run a docker logs command on them to see why they can’t start.
However, everything should work - if it does, fire up that victory dance.
TUTORIAL FINAL THOUGHTS
As always you can find all the completed tutorial files in the public git repo under the Tutorial 07 directory here: https://github.com/maxfields2000/dockerjenkins_tutorial.
If you have comments or technical questions about this tutorial please leave them below and I’ll happily answer them!
For more information, check out the rest of this series:
Part I: Thinking Inside the Container
Part II: Putting Jenkins in a Docker Container
Part III: Docker & Jenkins: Data That Persists
Part IV: Jenkins, Docker, Proxies, and Compose
Part V: Taking Control of Your Docker Image
Part VI: Building with Jenkins Inside an Ephemeral Docker Container
Part VII: Tutorial: Building with Jenkins Inside an Ephemeral Docker Container (this article)
Part VIII: DockerCon Talk and the Story So Far